
A bathroom renovation doesn’t require a contractor’s budget or six-month timeline. With solid planning, the right tools, and realistic expectations about what a homeowner can tackle, most bathrooms can be dramatically transformed in two to four weeks. The key is knowing which projects deliver the highest visual impact for the effort invested, and which ones demand professional help. This guide walks through the planning, materials, execution, and common pitfalls of a DIY bathroom remodel, from cosmetic updates that refresh tired fixtures to moderate-complexity projects like tile work and vanity replacement.
Key Takeaways
- A DIY bathroom renovation can be completed in two to four weeks by focusing on high-impact updates like vanity replacement, flooring, and lighting while leaving complex plumbing or electrical work to licensed professionals.
- Proper subfloor inspection and repair is critical to the success of any DIY bathroom renovation; water damage and rot hidden beneath old flooring will compromise new tile or vinyl within months.
- Luxury vinyl plank (LVP) is the most DIY-friendly flooring option at $2–$5 per square foot, but ceramic and porcelain tile require meticulous subfloor prep, waterproofing membranes, and careful layout planning to avoid costly mistakes.
- Always allocate 10–15% of your budget as contingency for surprises and buy extra materials for cuts and future repairs, as product lines and dye lots change and matching later becomes difficult.
- Essential waterproofing steps include using cement board in wet areas, applying liquid or sheet membranes like RedGard on joints and shower corners, and letting all adhesives cure fully before grouting to prevent mold and structural damage.
- Know your limits: moving drain lines, relocating plumbing, or adding electrical circuits require permits and licensed professionals; attempting these without expertise risks code violations and expensive repairs.
Planning Your DIY Bathroom Renovation Project
Start by assessing the scope honestly. Cosmetic updates, paint, fixtures, mirrors, hardware, don’t require permits and can be done over a weekend. Anything involving plumbing relocation, electrical circuits, or structural changes (removing walls, moving drains) typically requires permits and should involve licensed professionals.
Measure the space carefully: floor dimensions, ceiling height, door swing clearance, and existing fixture rough-in locations. Rough-in measurements (the distance from the wall to the center of the drain or water supply) are critical if replacing a toilet or vanity. Standard toilet rough-in is 12 inches from the finished wall, but older homes may have 10-inch or 14-inch rough-ins.
Create a priority list. Focus budget on high-impact elements first: vanity, flooring, lighting. Leave lower-priority cosmetics (towel bars, décor) for the end. Allocate 10-15% of the total budget as a contingency for surprises, rotted subfloor, outdated plumbing, or incorrect measurements.
Check local building codes before starting. The International Residential Code (IRC) sets minimum clearances: toilets need at least 15 inches from centerline to any sidewall and 21 inches of clear space in front. GFCI outlets are required within 3 feet of any water source per the National Electrical Code (NEC). Codes vary by jurisdiction, so confirm requirements with the local building department if work involves electrical or plumbing changes.
Essential Tools and Materials You’ll Need
Tools:
- Demolition: Pry bar, hammer, utility knife, reciprocating saw (for removing old vanities or cutting drywall)
- Tile work: Tile cutter or wet saw (rent if doing more than 50 sq ft), notched trowel (size depends on tile: ¼” × ¼” for wall tile up to 8″×8″, ½” × ½” for larger floor tile), grout float, tile spacers
- Plumbing: Adjustable wrench, basin wrench (tight spaces under sinks), Teflon tape, plumber’s putty, PVC cutter if working with drain lines
- Painting: Roller and tray, angled brush, painter’s tape
- Measurement & layout: Tape measure, level (4-foot for floors and walls), pencil, chalk line
- Safety: Safety glasses, dust mask or respirator (especially during demo or when cutting cement board), work gloves, knee pads
A miter saw gives cleaner cuts on trim and baseboards compared to a circular saw, but both work. If tiling, a wet saw produces smoother edges on porcelain and ceramic than a manual snap cutter.
Materials:
- Flooring: Luxury vinyl plank (LVP), ceramic or porcelain tile, or waterproof laminate. Budget 10-15% extra for cuts and mistakes.
- Walls: Moisture-resistant drywall (greenboard) or cement board behind tile. Paint: use semi-gloss or satin finish for easy cleaning and moisture resistance. Expect 350-400 sq ft coverage per gallon.
- Vanity & fixtures: Pre-built vanities run $200–$800 depending on size and material. Faucets, showerheads, and towel bars in matching finishes (brushed nickel, matte black, chrome).
- Underlayment: For tile floors, use ¼” or ½” cement board over plywood subfloor. LVP can go directly over clean, level subfloor.
Budget-Friendly Updates That Make the Biggest Impact
Vanity and Fixture Upgrades
Replacing a dated vanity instantly modernizes the bathroom. Measure the existing footprint and rough-in locations before shopping. Most stock vanities come in 24″, 30″, 36″, 48″, and 60″ widths. If the new vanity doesn’t align perfectly with existing plumbing, flexible supply lines and P-trap extensions give a few inches of wiggle room, but avoid major drain relocations without a plumber.
Installation is straightforward: turn off water at the shutoff valves, disconnect supply lines and drain, remove the old vanity, check the wall for level and stud locations, anchor the new vanity to studs with 3″ screws, reconnect plumbing, and seal the countertop edge with caulk.
Upgrade faucets and showerheads at the same time. WaterSense-labeled fixtures use no more than 2.0 gallons per minute (gpm) for showerheads and 1.2 gpm for faucets, reducing water bills without sacrificing pressure. Match finishes across all fixtures for a cohesive look.
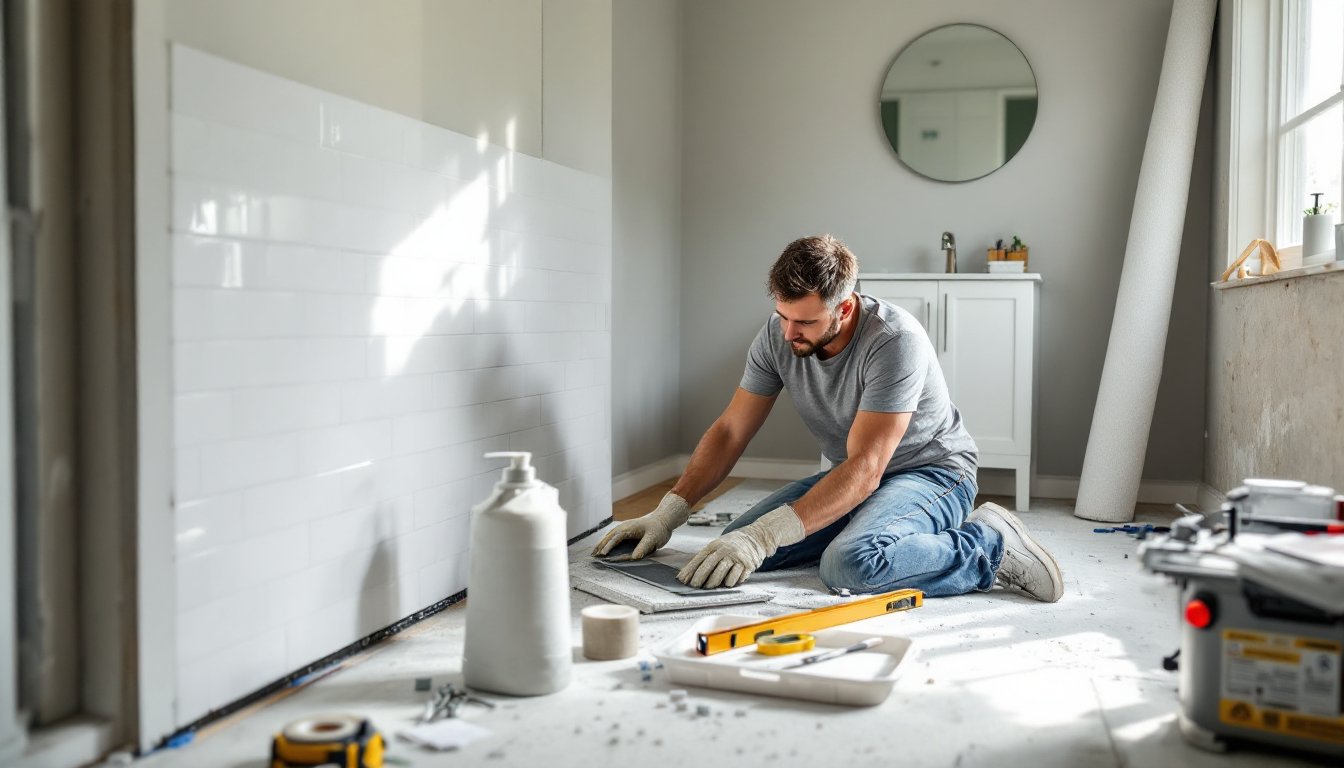
Tile and Flooring Refresh
Nothing transforms a bathroom faster than new flooring. Luxury vinyl plank (LVP) is the most DIY-friendly option: waterproof, forgiving on uneven subfloors, and installs with click-lock or adhesive backing. It costs $2–$5 per square foot and can be cut with a utility knife.
Ceramic or porcelain tile offers durability and a higher-end look but requires more skill. Subfloor prep is critical, any flex or unevenness telegraphs through tile and causes cracking. Use a level and straight edge to check for dips or humps. Subfloor should be at least 1¼” thick (typically ¾” plywood plus ½” cement board).
For wall tile (common in shower surrounds), install ½” cement board over studs, tape seams with fiberglass mesh, and apply a waterproofing membrane on joints and corners. Layout is everything: dry-fit tiles first, plan cuts to fall in less visible areas, and use spacers to maintain consistent grout lines. Standard grout joints are ⅛” to ¼” depending on tile size. Many home renovation projects succeed or fail based on the quality of surface prep and layout.
Paint is the easiest high-impact update. Use a bonding primer on glossy surfaces (old tile, laminate) before top-coating. Semi-gloss or satin finishes resist moisture and wipe clean. Two coats usually suffice. If painting over bold colors or stains, tint the primer to match the topcoat.
Step-by-Step Renovation Timeline and Process
Days 1–2: Demo and prep
- Turn off water supply at the main or fixture shutoffs.
- Remove old fixtures: toilet (unbolt from flange, lift straight up), vanity (disconnect plumbing, unscrew from wall), mirror, light fixtures.
- Pull up old flooring carefully. Inspect subfloor for rot, soft spots, or water damage. Replace damaged sections with ¾” plywood cut to fit and screwed into joists every 8 inches.
- Patch and sand walls. Remove any loose paint or wallpaper.
Days 3–5: Flooring and wall prep
- Install cement board if tiling floors or walls. Screw sheets to studs or subfloor every 8 inches, leaving ⅛” gaps at seams. Tape seams with fiberglass mesh and thin-set mortar.
- For LVP, ensure subfloor is clean, dry, and level within 3/16″ over 10 feet. Let planks acclimate to room temperature for 48 hours before installing.
- Lay tile or LVP, starting from the center or most visible wall. Use a notched trowel to spread thin-set (for tile) evenly, press tiles firmly, and insert spacers. Allow thin-set to cure per manufacturer instructions (usually 24 hours) before grouting.
Days 6–8: Fixtures and finishes
- Install vanity: level it with shims if needed, anchor to wall studs, attach countertop.
- Reconnect plumbing: supply lines to faucet, P-trap to drain. Hand-tighten, then snug with a wrench, overtightening cracks fittings.
- Set toilet on new wax ring, bolt to flange, connect water supply.
- Install light fixtures and outlets. If replacing fixtures, match wire colors (black to black, white to white, ground to ground) and secure with wire nuts. If upgrading circuits or adding outlets, hire a licensed electrician.
- Apply grout to tile joints with a float held at 45°, pressing into gaps. Wipe diagonally with a damp sponge after 15–20 minutes. Let cure 48–72 hours, then seal grout to prevent staining.
- Caulk all seams: vanity backsplash, tub/shower edges, baseboards. Use 100% silicone for wet areas.
Days 9–10: Paint and final touches
- Paint walls and trim with two coats, allowing each coat to dry per label (usually 2–4 hours).
- Install hardware, mirrors, towel bars, and accessories.
A complete remodel can be finished in two weeks with focused effort and proper planning. Build in extra time if learning new skills or waiting on materials.
Common Mistakes to Avoid During Your Bathroom Remodel
Skipping subfloor inspection. Water damage and rot hide under old flooring. A soft or spongy subfloor will ruin tile or LVP within months. Always inspect and repair before laying new flooring.
Ignoring ventilation. Bathrooms need exhaust fans rated for the room size, minimum 50 CFM for bathrooms up to 50 sq ft, add 10 CFM per additional 10 sq ft. Poor ventilation leads to mold, peeling paint, and warped materials. DIY design inspiration sites like Young House Love and Hunker emphasize that ventilation is as important as aesthetics.
Wrong tile for the application. Wall tile (often thinner, lighter) isn’t rated for floors. Floor tile must have a PEI rating of 3 or higher for residential traffic. Porcelain is denser and more water-resistant than ceramic, critical for wet areas.
Improper waterproofing. Cement board isn’t waterproof by itself, it’s water-resistant. Use a liquid or sheet waterproofing membrane (RedGard, Kerdi) on joints, corners, and seams in shower areas. Skipping this invites mold and structural damage.
Forgetting expansion gaps. Tile, LVP, and even drywall expand and contract with humidity. Leave ¼” gaps at walls and transitions, covered by trim or caulk. Tight fits cause buckling or cracking.
Overlapping DIY limits. Moving drain lines, adding circuits, or structural changes require permits and licensed trades. Attempting these without expertise risks code violations, failed inspections, and costly repairs. Know when to call a pro.
Rushing grout and caulk. Let thin-set cure fully before grouting. Let grout cure before sealing. Use caulk, not grout, at change-of-plane joints (tub edge, corners). Grout cracks: caulk flexes.
Underestimating material needs. Always buy 10–15% extra tile, paint, and flooring for cuts, mistakes, and future repairs. Dye lots and product lines change, matching later is difficult.
Taking shortcuts on prep, skipping primer, not leveling subfloors, neglecting to locate studs, causes more headaches than the time saved. Measure twice, cut once, and don’t skip steps.


