
A bathroom DIY makeover doesn’t require hiring contractors or emptying your savings account. Whether you’re refreshing tired finishes, updating outdated hardware, or completely rethinking your layout, a strategic approach to a DIY bathroom renovation can deliver impressive results without the sticker shock. The key is smart planning, prioritizing high-impact changes, and knowing when to bring in professional help for technical plumbing or electrical work. This guide walks you through a practical DIY bathroom remodel framework, from budget planning and space assessment to paint, flooring, storage solutions, and finishing touches. By tackling a diy bathroom reno strategically, most homeowners can transform their space in weeks rather than months.
Key Takeaways
- A strategic DIY bathroom makeover prioritizes high-impact, low-cost updates like paint, hardware, and lighting to transform your space in weeks without contractor costs.
- Set a realistic budget with 20% padding for unexpected costs, and determine which existing elements (vanity, flooring, fixtures) will stay to control expenses.
- Paint with moisture-resistant finishes, updated cabinet hardware ($40–$150), and improved task lighting deliver the highest visual return for minimal investment in a bathroom renovation.
- Refresh flooring affordably using epoxy floor paint or vinyl plank flooring (LVP) instead of expensive tile replacement, keeping your DIY bathroom reno budget-friendly.
- Maximize storage with open shelving, drawer organizers, and strategic towel placement to create a cleaner, more organized appearance that boosts perceived quality.
- Unify your space with coordinated accessories—towels, bath rugs, soap dispensers, and decor elements in matching finishes—to complete your DIY bathroom makeover with intentional style.
Plan Your Bathroom Makeover and Set a Realistic Budget
Before you buy a single can of paint or pull off cabinet hardware, sit down with a notebook and honest assessment. The Home Depot recommends thoroughly planning your project, including which elements will stay unchanged, to keep costs manageable. Determine what stays: your vanity, countertop, existing flooring, faucets, or towel rings. Those anchors become your financial control points.
Set a realistic overall budget and timeline. Add 20% padding for unexpected costs, surprise water damage behind walls, delayed shipments, or materials that don’t fit as planned happen on nearly every DIY bathroom renovation. If your project touches plumbing or electrical systems, plan to hire licensed professionals for those sections. Unpermitted work can void insurance or create safety hazards.
Assess Your Current Space and Identify Priority Updates
Take precise measurements of your bathroom. Measure wall heights, cabinet widths, window openings, and the distance from the vanity to the wall. Sketch your layout, even a rough pencil drawing on graph paper prevents costly mistakes when ordering mirrors, shelving, or vanity components.
List which elements bother you most: Is the lighting dim and unflattering? Do cabinet handles feel dated? Is the paint chipped or the wall color soul-draining? Your frustration list becomes your priority list. A bathroom renovation on a budget means choosing 3–5 major changes, not 15. When your budget is tight, paint, hardware, lighting, and accessories deliver the highest visual return for the lowest investment.
Tackle High-Impact, Low-Cost Updates First
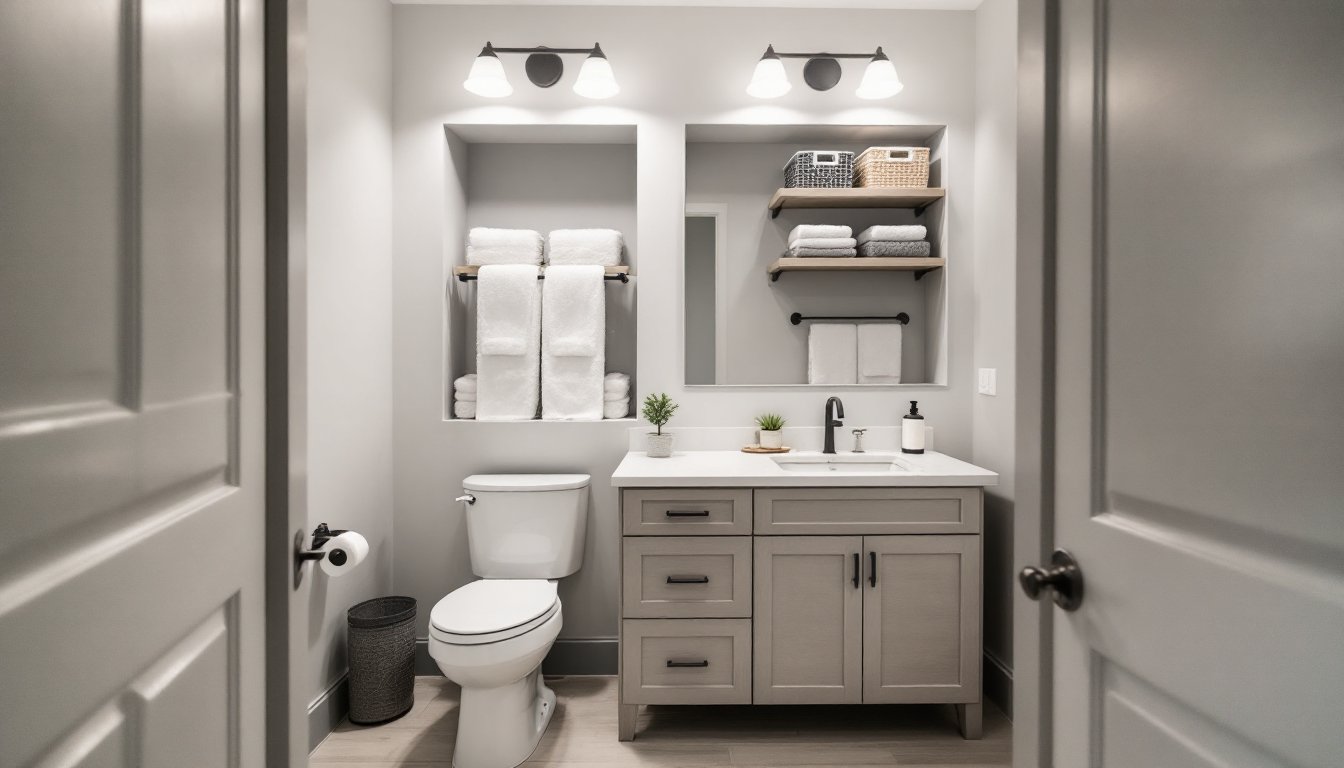
Start with the projects that transform appearance without touching structure. Cabinet hardware, paint, mirrors, and lighting are the “quick wins” of any DIY bathroom makeover. Replacing knobs and drawer pulls on your existing vanity costs $40–$150 but instantly modernizes the space. Choose finishes like matte black, brushed nickel, or polished chrome, avoid trendy finishes that date quickly.
Paint is your secret weapon for a budget bathroom reno. A fresh coat of semigloss or satin finish paint in white, soft gray, or warm neutral makes walls feel clean and opens up smaller spaces. Bathroom paint must resist moisture: use paint rated for high-humidity environments. One coat covers roughly 350 square feet per gallon, a typical bathroom takes 1–2 gallons. Prep work is critical: wash walls, sand any glossy surfaces, and apply primer to cover stains or color changes.
Refresh Paint, Hardware, and Lighting for Maximum Results
Lighting can’t be overlooked. A single overhead fixture casts harsh shadows across the sink, not flattering or functional. Add task lighting beside or above the mirror using LED vanity strips or small sconces. These run 12–18 watts and cost $30–$80 installed. Many can be wired into your existing fixture with help from a licensed electrician if you’re not confident with electrical connections.
Mirrors are another high-impact swap. A frameless mirror or one with a simple metal or wood frame ($50–$200) feels current compared to old beveled or ornate designs. Mirrors also bounce light around the space, making it feel larger. Update towel bars and hooks with matching hardware in your chosen finish. These small touches tie the room together and cost minimal money.
Update Flooring and Wall Finishes Without Breaking the Bank
Replacing tile or vinyl flooring is expensive and often requires professional installation. A smarter budget approach: refresh what you have. If your tile is dated but intact, epoxy floor paint rated for bathrooms ($30–$60 per gallon) creates a sealed, washable finish. Prep is essential, clean thoroughly, degrease with TSP (trisodium phosphate), sand to dull the gloss, and apply primer before topcoat. This isn’t permanent, but it buys 3–5 years of updated appearance.
For walls, stick with paint first. If you want pattern, peel-and-stick wallpaper designed for bathrooms ($15–$40 per roll) avoids moisture issues that plague standard wallpaper. Apply it to accent walls, the area behind the vanity or above the toilet, rather than the whole room, stretching your budget further. Some homeowners add MDF paneling painted and sealed to create a wainscot effect: one complete project used paneling, paint, and wallpaper for under $500.
If budget allows and you’re willing to tackle flooring, vinyl plank flooring (LVP) mimics wood or stone, costs $1.50–$4 per square foot, and installs over existing flooring without adhesives, perfect for DIYers. Waterproof luxury vinyl resists moisture better than laminate. Watch installation videos carefully and take your time. A poorly installed plank job shows immediately and becomes frustrating every time you walk in.
Maximize Storage and Organization for a Cleaner Look
A cluttered bathroom looks small and dated, even with fresh paint. Install open shelving above the toilet or beside the sink using simple brackets and reclaimed wood or painted boards ($40–$100 for materials). Shelves create visual interest while holding folded towels, baskets for washcloths, or decorative jars. Make sure shelves are securely fastened into wall studs or use heavy-duty anchors rated for at least 25 pounds per shelf.
Maximize your vanity’s existing storage. Add drawer organizers or pull-out baskets ($10–$30) to keep under-sink items accessible. If your vanity drawers are deep, a tiered organizer prevents that chaotic pile of hair ties and medications. For small bathrooms, a rolling cart ($30–$60) slides into tight corners and holds extra towels, cleaning supplies, or skincare products, it’s mobile, so you can move it when needed.
Towel bars and hooks positioned thoughtfully keep the room visually organized. Install a towel bar (24–30 inches wide) at comfortable reach height, around 42–48 inches from the floor. Add matching hooks beside mirrors or on the back of the door. These seem minor, but a neat arrangement of rolled towels and hanging robes instantly reads “organized,” boosting the whole bathroom’s perceived quality.
Add Style with Accessories and Decor Elements
Here’s where your DIY bathroom makeover personality shines. New towels, a bath rug, soap dishes, and a trash can seem small, but they unify the color scheme and set the mood. Choose towels in your new palette, if walls are soft gray, pair them with white or charcoal towels. A quality cotton bath towel runs $15–$25: spend a little more on comfort, as it’s used daily.
Add a bath rug that’s slip-resistant and moisture-wicking ($20–$50). Avoid light colors in a family bathroom: gray, navy, or earth tones hide stains. A rug anchors the space visually, especially if your flooring is light or plain. Wall decor, framed prints, a wooden sign, or a simple wall-mounted shelf with plants, brings warmth without clutter. You can transform your space: creative ideas for beautiful beachy bathrooms if coastal vibes appeal to you, or stick with your preferred aesthetic.
Finishing touches: a soap dispenser, toothbrush holder, and countertop organizer in matching finishes ($30–$80 total) look coordinated and intentional. Candles, small potted plants, or a woven basket for hand towels add texture. These elements cost pennies individually but create a curated, thoughtful space. Your bathroom transforms from purely functional to genuinely inviting, and you did it without a six-month timeline or contractor bills.


