Tight square footage doesn’t mean sacrificing style or functionality. Small nail salons, whether in a spare bedroom, garage conversion, or leased retail space, can feel open, professional, and welcoming with the right design strategies. The challenge lies in balancing client comfort, efficient workflow, and visual appeal within limited dimensions. This guide walks through layout planning, color choices, furniture picks, lighting techniques, and budget-conscious DIY updates that help small salon owners maximize every square foot without blowing the budget or requiring major structural work.
Key Takeaways
- Small nail salon interior design maximizes limited space by positioning manicure stations along walls, floating tables, and maintaining 36-inch walkway clearance for ADA compliance and efficient workflow.
- Light, neutral wall colors with monochromatic trim schemes visually expand the room, while color psychology through removable elements like towels and artwork keeps the palette flexible without overwhelming tight quarters.
- Multi-functional furniture such as manicure tables with built-in storage, lift-top waiting benches, and floating shelves on vertical space allows small salons to balance style with practical storage solutions.
- Layered lighting combining ambient overhead fixtures (30–50 lumens per square foot) and adjustable task lights at 75–100 lumens per square foot enhances both functionality and perceived spaciousness.
- Budget-friendly DIY updates including paint ($35–50 per gallon), floating shelves ($15–25 per shelf), and peel-and-stick vinyl flooring ($1–3 per square foot) deliver high design impact without major renovation costs.
Maximize Every Square Inch with Smart Layout Planning
Start by measuring the space precisely, walls, door swings, window placement, and electrical outlets. Record these dimensions on graph paper or a digital floor plan tool, using a 1:20 scale (one inch equals twenty inches). This prevents costly furniture purchases that don’t fit.
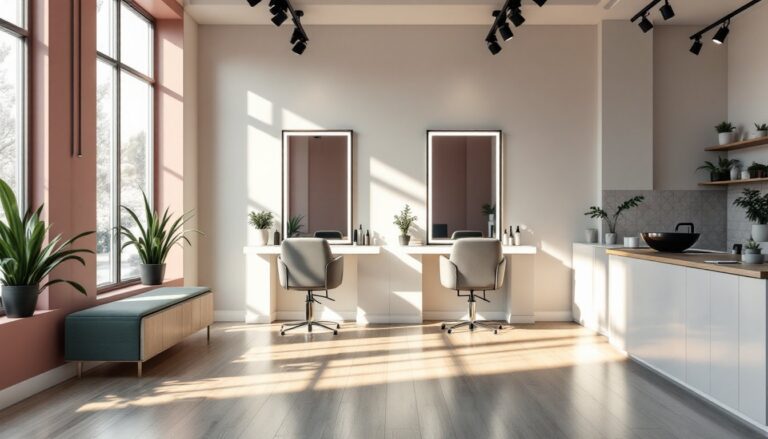
Position manicure stations along walls rather than in the center. Wall-mounted or floating tables free up floor area and simplify cleaning beneath units. For salons under 150 square feet, stick to two or three stations max: cramming in more reduces maneuverability for both technicians and clients.
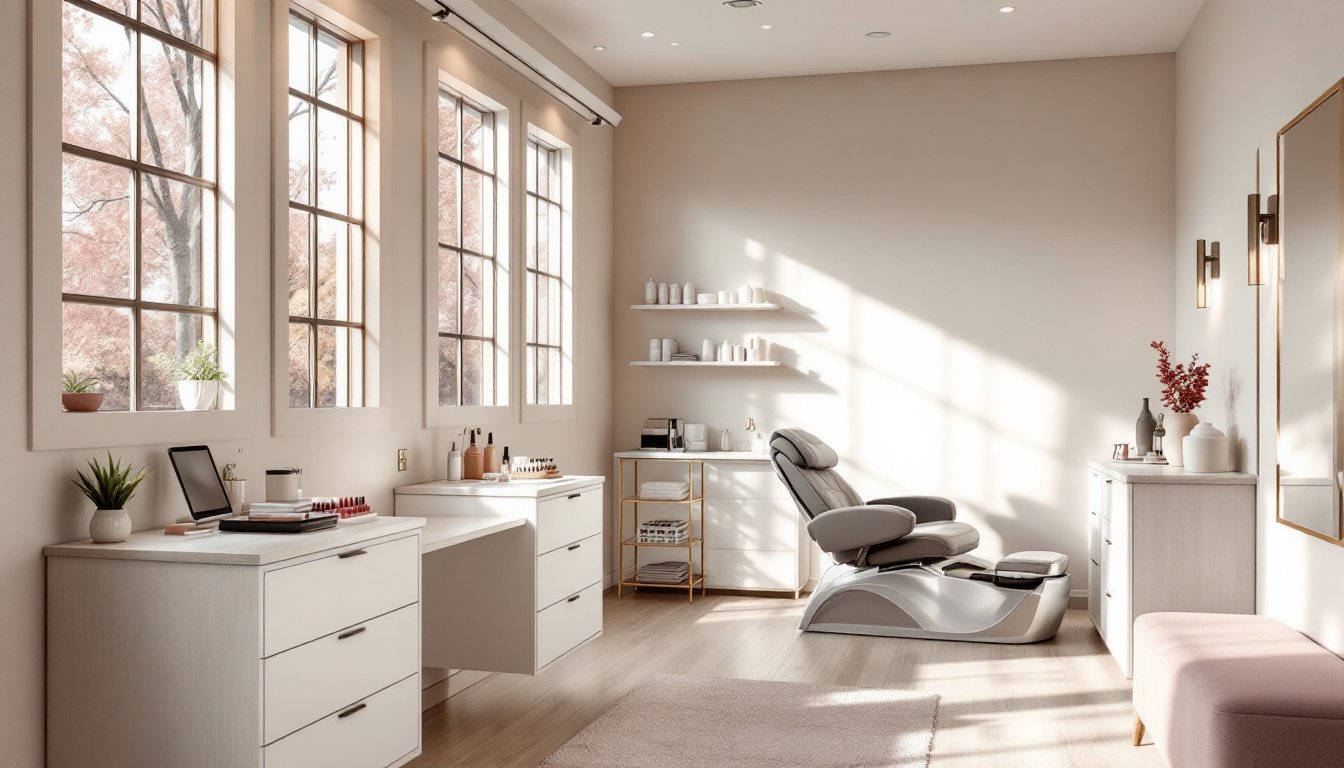
Place the reception desk near the entrance but not blocking sightlines to service areas. A compact corner desk (30–36 inches wide) or wall-mounted floating shelf with a tablet checkout system saves space. Keep the pedicure chair against a back wall to minimize plumbing runs if adding a sink later.
Leave at least 36 inches of walkway clearance between furniture pieces. This meets ADA guidelines where applicable and accommodates equipment carts. If the salon doubles as a home space, consider modular furniture on casters that can be rolled aside when not in use.
Zone the layout by function: reception/retail up front, services in the middle, storage and wash station at the rear. This workflow reduces cross-traffic and keeps supply runs efficient during busy periods.
Create the Perfect Color Palette for a Spacious Feel
Light, neutral wall colors reflect more lumens and push visual boundaries outward. Soft whites, warm grays, and pale blush tones work well for small salons. Avoid stark whites, which can feel clinical: instead, choose off-whites with undertones that complement your lighting (cool LED fixtures pair with blue-gray undertones, warm incandescents with beige or cream).
Paint the ceiling the same color as the walls, or go one shade lighter. This erases the visual boundary where walls meet ceiling, making the room feel taller. Skip accent walls in tiny spaces, they fragment the eye’s path and shrink perceived area.
For trim and molding, use semi-gloss or satin finish in the same family as the wall color. High-contrast trim (white baseboards against dark walls) chops up square footage visually. Monochromatic schemes create a seamless envelope.
Introduce color through removable elements: chair upholstery, towels, retail product displays, and artwork. This keeps the palette flexible as trends shift. If you crave bold hues, reserve them for a single feature, a painted interior door, a tile backsplash behind the sink, or a geometric floor runner.
Consider the psychology of color in beauty spaces. Blush pink and sage green promote relaxation, while navy or charcoal accents add sophistication without overwhelming. Test paint samples on multiple walls and observe them under both natural daylight and your installed lighting before committing to a full gallon.
Choose Multi-Functional Furniture and Storage Solutions
Every piece should earn its footprint. Look for manicure tables with built-in drawers and cubbies for polish, tools, and towels. Models with a lower shelf add storage without eating extra floor space. Wall-mounted tables fold flat when not in use, ideal for home-based salons that operate part-time.
Pedicure chairs with integrated storage compartments in the armrests or base hold client files, single-use liners, and retail samples. Skip bulky massage recliners if the room is under 120 square feet: opt for compact spa chairs with a footbath that tucks underneath when drained.
Install floating shelves at eye level for polish displays. Use uniform containers (acrylic organizers, small baskets, or magnetic strips) to keep bottles upright and visible. This merchandises retail products while freeing counter space for active services.
Replace traditional waiting chairs with a narrow bench that doubles as storage. Lift-top benches or benches with baskets underneath hold magazines, blankets, or cleaning supplies. If space allows only one seat, choose a stylish accent chair that complements your palette rather than a full loveseat.
Use vertical space with pegboards, magnetic knife strips (for metal tools), or slat-wall systems commonly used in retail. These keep frequently used items within arm’s reach without cluttering horizontal surfaces. Salons focused on compact storage solutions often adopt modular systems that adapt as inventory grows.
Lighting Tricks to Brighten and Expand Your Salon
Layered lighting is non-negotiable. Start with ambient overhead fixtures, LED recessed cans or flush-mount ceiling lights provide even base illumination. Calculate coverage at roughly 30–50 lumens per square foot for general salon lighting. For precision work, bump task lighting to 75–100 lumens per square foot at the manicure station.
Add adjustable task lights at each workstation. Swing-arm wall sconces or clamp-on LED lamps with color-temperature controls (5000K daylight mimics natural light best for color matching) give technicians control without permanent wiring changes. Battery-operated or plug-in models avoid electrical permits in most jurisdictions.
Place mirrors opposite windows or light sources to double the effect. A full-length mirror or large decorative mirror on one wall reflects both natural and artificial light, tricking the eye into perceiving more space. Frameless or slim-profile mirrors keep the look airy.
Replace solid doors with frosted glass or add a transom window above the entry door to borrow light from adjacent rooms. If privacy isn’t a concern, swap standard curtains for sheer panels or top-down/bottom-up cellular shades that let daylight in while obscuring sightlines.
Install dimmer switches on overhead circuits. Bright, clinical lighting suits service hours, but softer light creates ambiance for consultations or retail browsing. Smart bulbs with app control offer color-temperature adjustments without rewiring. Techniques for maximizing natural light apply equally to residential and commercial small spaces.
Add Personality with Mirrors, Artwork, and Decorative Accents
Mirrors serve double duty: functional tools and visual expanders. Hang a large framed mirror (36×48 inches or larger) on the longest uninterrupted wall. Lean an oversized floor mirror against a corner if wall mounting isn’t feasible. Beveled or antiqued edges add character without busy patterns.
Select artwork that reinforces your brand but doesn’t clutter. One or two large pieces (24×36 inches minimum) make a stronger statement than a gallery wall in tight quarters. Canvas prints, framed botanical illustrations, or minimalist line drawings work well. Avoid glass-front frames in service areas where acetone and aerosols can streak or damage them.
Introduce texture through textiles and accent pieces. A jute or low-pile area rug (easy to clean, stain-resistant) defines the waiting zone. Swap standard towels for Turkish cotton or waffle-weave versions in your accent color. Small potted succulents or air plants (real or high-quality faux) add life without maintenance headaches.
Use the reception desk or a narrow console as a styling vignette. Group items in odd numbers: a small tray with business cards, a candle, and a single decorative object. Keep it uncluttered, three to five items max.
Consider a feature wall treatment that doesn’t shrink space. Vertical shiplap, board-and-batten paneling painted the same color as adjacent walls, or peel-and-stick 3D wall panels add dimension without visual weight. If you’re drawn to rustic design elements, weathered wood accents or reclaimed barn board can introduce warmth without overwhelming a small footprint.
Budget-Friendly DIY Updates for Small Salon Spaces
Paint delivers the highest return per dollar. A gallon of quality interior latex paint (around $35–50) covers roughly 350–400 square feet. One gallon is typically enough for a small salon’s walls with two coats. Use a high-hiding primer (like Zinsser Bulls Eye 1-2-3) if covering dark colors or patching repairs. Prep is everything: patch holes with lightweight spackle, sand smooth with 150-grit paper, and wipe down walls with a damp cloth before rolling.
Build your own floating shelves from 1×10 or 1×12 pine boards (actual dimensions 3/4″ × 9.25″ or 11.25″) and concealed bracket hardware. Cut boards to length with a circular saw or miter saw, sand edges, apply stain or paint, and mount with heavy-duty floating shelf brackets rated for at least 50 pounds. Cost per 48-inch shelf: $15–25 in materials.
Upgrade cabinet hardware and light switch plates for instant polish. Swapping builder-grade plastic switches for brushed nickel or matte black toggle switches costs under $5 per plate. New drawer pulls (spaced on existing holes to avoid drilling) refresh cabinets without refinishing.
Install peel-and-stick vinyl tile or luxury vinyl plank (LVP) flooring over existing surfaces if the subfloor is level and clean. LVP planks (around $1–3 per square foot) click together without adhesive or underlayment in many cases. This is a weekend project for spaces under 150 square feet and requires only a utility knife, straight edge, and spacers. Check manufacturer guidelines, some products need a vapor barrier over concrete.
Create custom artwork by framing fabric remnants, wallpaper samples, or pressed botanicals in shadow boxes. Pre-cut mat boards and ready-made frames (from craft stores or online) keep costs low. For textural interest, stretch canvas drop cloth over 1×2 pine stretcher bars (build your own for under $10 per frame) and apply a simple geometric pattern with painter’s tape and craft paint.
Reupholster waiting chairs or pedicure chair cushions with heavy-duty vinyl or outdoor fabric (resists stains and cleans easily). Remove existing fabric, use it as a template, cut new material with 1-inch seam allowance, and staple in place with a manual or electric staple gun and 3/8-inch staples. One yard of upholstery vinyl ($15–30) covers most chair seats.
Conclusion
Small salon design is about discipline, choosing pieces that work hard, colors that expand, and layouts that flow. Every finish, fixture, and furnishing should support both aesthetics and daily operations. With smart planning, a compact nail salon can feel just as professional and inviting as a sprawling spa, proving that square footage matters far less than how it’s used.